You must be signed in to read the rest of this article.
Registration on CDEWorld is free. You may also login to CDEWorld with your DentalAegis.com account.
Because dentists and their patients may have different perspectives on esthetics, meeting patients’ expectations should start with a meeting of the minds.
Get on the Same Page
The first step in dealing with anterior cases is to determine the patient’s expectations. Dentists may view anterior teeth differently than their patients, so it is important to get an idea of what they have in mind through discussion and visual information such as photographs, magazine pictures, etc. Perhaps the best starting point for creating a restoration that will meet the patient’s needs and expectations is to place a mock-up that simulates the shade and contour of the planned restoration. Patients must be happy with the appearance of their restorations and, at the same time, be able to function comfortably and speak without a lisp or difficulty in pronouncing different syllables.
Cookbook Approach
Whether it is just a couple of teeth or a full set of veneers, the author recommends “a cookbook” approach—ie, using a protocol for anterior cases that can be followed successfully for predictable results.
Sign-off Sheet
This starts with creating a “sign-off sheet” that tracks each step of the protocol and specifies related materials and documentation, including clinical photographs, cosmetic imaging, radiographs, impressions, mock-ups, provisionals, laboratory instructions, and, importantly, a signed patient informed consent that is witnessed by a staff member.
Pretreatment Clinical Photographs
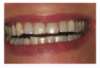
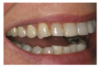
Clinical photographs should be taken while positioning the flash at different angles. This allows the facial texture of the tooth surface to be viewed more easily, as the light from the flash bounces back at different angles. The photographic views should include a frontal smile taken while the patient holds an “E” sound that demonstrates the mobility of the upper lip (Figure 1); having them say and hold the letter E will usually elevate the lip to show the the gingival areas. There should also be separation of the maxillary and mandibular teeth. In addition, there should be a lateral view taken at a 45° angle, plus retracted frontal and lateral views (Figure 2).
Impression(s)
Throughout the case, several impressions may be taken. The author favors the double-pour method using one model to create the provisional restoration or “mock-up” and the other as an unaltered permanent record.
Cosmetic Imaging
There are a number of commercial dental cosmetic imaging software programs available that generally use a “cut and paste” technique that simulates an entire smile. These specific imaging programs are usually expensive compared to photographic enhancing programs such as Adobe Photoshop Elements, which can be used by the clinician or a staff member to modify a patient’s smile cosmetically. Using a variety of tools within the software program, each individual tooth can be lengthened, shortened, rotated, or even aligned correctly. Diastemas can be closed and gingival contours and margins can also be modified. Then, after the structural changes are completed, the shade of the teeth can be changed.
There are potential problems that can arise from the “cut and paste” approach; for example, anatomical or structural issues may preclude the dentist and/or laboratory from delivering the simulated enhancement. This can lead to a patient’s dissatisfaction with the treatment based on expectations gained from the enhanced photograph. For that reason, the tooth-by-tooth approach is much more predictable in terms of meeting the patient’s expectations.
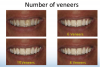
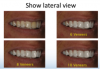
The cosmetic imaging can show the patient variations of treatment. For example, the patient can see the differences in treating the six anterior teeth versus including the first bicuspids or the first and second bicuspids (six, eight, or 10 veneers). The cosmetic imaging should be done from a frontal and lateral view. It should be pointed out to the patient when showing the lateral view that this view is what other people see versus what the patient sees in the mirror (frontal view).
After the consultation, the patient should be sent home with 8 x 10 prints (one can be digital) showing the different variations, so the proposed treatment plan can be shared with friends and family members if desired. Several studies show a 50% increase in treatment acceptance among patients who can see before-and-after pictures of their own teeth.1,2
Conducting the Consultation Appointment
During the consultation appointment, the dentist can first show the patient any occlusal concerns (if present) on the original models and the necessary treatment to correct it. The patient must understand that if the cause of their dental problem is not addressed, the longevity of the cosmetic treatment will be compromised.
During this appointment, the patient can view a variety of treatment plans using different before-and-after images. For example, the frontal view is what the patient usually sees in the mirror. Using altered frontal images, patients can see what their teeth would look like with different treatment variations (six, eight, or 10 veneers) (Figure 3).
Using the same approach but from a lateral view, patients can also see variations of the treatment from an angle they do not see in the mirror but can be seen by others (Figure 4).
Obtaining Informed Consent
After the details of the treatment plan are finalized, it is important that a written informed consent form is presented to the patient before treatment commences. This document should include the agreed-upon treatment plan and possible complications, risks, and benefits. It should be signed by the patient and witnessed and signed by a staff member.
Create and Evaluate Mock-up
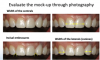
The mock-up is created in the laboratory on one of the models using old composite that will simulate the proposed treatment. A vacuum-formed stent is fabricated and cut out following the gingival contour of the teeth involved in the treatment and filled with a composite material. The shade selected is a starting point but may not necessarily be the final shade. Using the composite-filled stent, a copy of this mock-up or provisional restoration is bonded on the involved teeth using a total-etch system (etching the entire facial surface, not spot-etching) to simulate the final restorations. The patient wears the provisional restoration for several days or weeks during which he or she is able to evaluate its esthetics, phonetics, and function. This enables the patient to “test drive” the new restorations, which should also be photographed for further evaluation by the clinician (Figure 5).
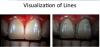
An assessment of the mock-up can be brought down to a visualization of lines in evaluating contours of the teeth (Figure 6).
For the clinician, photography is a useful medium to evaluate the mock-up. Any corrections can be easily made during the “test drive” by adding or subtracting to the provisional material. Once the patient is satisfied, a new impression and model can be made.
The Provisional Restoration
The provisional restoration based on the first impression and model—which may itself be modified during mock-up creation and evaluation—offers the clinician and the patient the opportunity to evaluate the planned restoration and make needed modifications prior to fabrication and seating of the final permanent restorations.
Provisional Restoration Placement
After informed consent is secured, the provisional restorations are placed using a local anesthetic. To create the provisional, a vacuum-form stent made from the mock-up model is filled with a soft composite of the shade of the proposed restorations. Depending on the composite used, the flow can be increased by either softening in warm water or placing the composite in a microwave oven.
The overhead chair light is turned off. After etching the entire facial surface of all the teeth involved, a bonding agent is applied, and the vacuum-form stent is completely seated. Depending on the flow of the composite, it may take a little more time to completely seat the stent.
During the fabrication of the stent on the model, the edge of the stent is trimmed to the gingival margin around the involved teeth. During the seating of the stent, the excess material can easily be removed around the gingival margin. With the stent in place, the composite is light-cured. The stent is then removed and the provisional restorations are trimmed and polished. The occlusion is then checked in centric and eccentric positions.
Provisional Restoration Evaluation
The patient wears the provisional for a period of time—usually several days—which provides the opportunity to “test drive” the planned restorations. The patient can “try out” the restorations and evaluate the esthetics, phonetics, and function. These are the restorative criteria that must be satisfied before the treatment can go forward. The esthetic evaluation is based on the shade, the shape, and the contour of the provisional restorations. Composite material can be added or subtracted to maximize the appearance. The phonetic evaluation is based on whether or not the patient has difficulty with certain syllables or “F” and “V” sounds, for example, “55.” If the incisal edge encroaches on the lower lip during these sounds, the length needs to be shortened. Finally, during the functional evaluation, the patient actually chews food and reports back to the clinician any difficulty encountered while eating a meal. Adjustments are subsequently made until the patient is satisfied with the provisional restorations. A new impression is then made before the teeth are prepared for laboratory purposes.
Preparation Appointment
At the preparation appointment, all materials and information needed by the laboratory to create the final restorations—as described below—are gathered, evaluated, and sent to the laboratory.
1. Photographs
To ensure the correct choice of color, the author recommends close-up photography, using the ring flash as a point flash by removing it from the camera and pointing it at different angles. This allows color and texture to be easily seen. A teleconverter lens can be attached to the dental close-up lens to capture greater detail. The manufacturer’s shade tab—showing its name—should be visible in the picture next to the teeth, as should the stump shade, so the laboratory can use the correct composite die material and shade to exactly reproduce what the patient is expecting.
2. Impression(s)
Two final impressions of the prepared teeth should be taken. The reasoning behind taking a second impression is that if the first impression has a questionable area that cannot be seen in the second impression, there is a discrepancy. If that questionable area is seen in both impressions, it is part of the preparation. The time and expense required to take a second impression is minimal compared to the inconvenience to the patient of having to return for an unexpected appointment.
3. Opposing Model and Bite Registration
An opposing model is necessary. The bite registration included should be made of a polyvinyl material that covers only the prepared teeth. After it is set, it should be removed and trimmed of excess material on the occlusal, buccal, and lingual sides. All undercuts and interproximal “fins” must also be removed as they would prevent a passive seating onto the models. Avoid sending “mush bite” registrations that cover all of the prepared and unprepared teeth. These are too difficult to properly seat on the working models in the laboratory.
4. Articulation Tools: Facebow, Bitestick, or Laboratory Provisional
While the best articulator is the patient, the laboratory needs to duplicate the patient’s horizontal, frontal, and sagittal planes onto an articulator. The purpose of a facebow is to do just that. There are several methods that can convey that information. However, an earbow, which is used frequently because of its simplicity, should be avoided. Most patients’ ear canals are not at the same level and therefore create an incorrect horizontal plane on the articulator, resulting in restorations with a canted midline plane. The frontal and horizontal planes are duplicated if the lingual and facial aspects of the provisional restorations are reproduced in the laboratory. The remaining sagittal plane (facial midline), which is at a 90° angle to the esthetic or horizontal plane, can be transferred using a Kois Dento-Facial Analyzer, a cross stick, or laboratory provisional that includes at least two anterior teeth.
5. Model of the Approved Provisionals
It is the model of the approved provisional restorations that is used to make the final restoration through a duplication technique using the “wax injection method” described below.
6. Laboratory Prescription
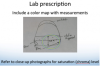
In addition to images, the laboratory prescription should include a color map with measurements, and references to the close-up photographs for saturation (chroma) level and facial characteristics of the teeth. The shade of the prepared teeth should also be included. A photograph of the prepared teeth with the inclusion of a stump shade guide tab will provide the technician the color of the prepared tooth. This allows the technician to compensate for any “bleed through” of the underlying color that may affect the final shade of the restoration.
Case Study
The case described below demonstrates the “cookbook approach,” illustrating its use up to and after the laboratory receives materials and instructions pertinent to final restoration fabrication.
This patient wanted to replace her existing crowns on teeth Nos. 9 through 11. This case involved matching the contralateral central incisor, a lateral incisor, and a canine tooth. She presented to the author’s practice wearing temporarily cemented permanent crowns; she had been dissatisfied with the appearance of these crowns during several attempts by another dentist to replace them over an 18-month period.
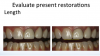
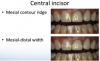
Evaluation of Existing Restorations
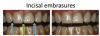
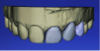
The first thing the author did when the patient presented was to evaluate the existing restorations, noting the following: In examining the central incisors, tooth No. 9 was shorter in length than No. 8 (Figure 7), the mesial contour ridge of No. 9 did not line up with No. 8, and the mesial-distal width of the two centrals did not match (Figure 8); likewise, the incisal embrasures did not match up (Figure 9). In the lateral incisor position (because of canine substitution, they were really canine teeth in this case), the mesial contour ridge of this tooth and the contralateral tooth were evaluated for symmetry as well as the mesial-distal width (Figure 10).
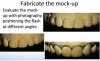
Mock-up Fabrication and Evaluation with Photography
The mock-up was fabricated, placed, and evaluated with photography, positioning the flash at different angles, as described above (Figure 11). Based on the patient feedback, adjustments were made until the patient was satisfied. A new alginate impression and model were made and prepared for the laboratory, which was sent all appropriate information, as described above.
Provisional Duplication
The laboratory received the above materials and duplicated the provisionals using the wax injection technique. Using a wax injection unit (used by jewelers to duplicate wax patterns while making jewelry), melted wax was injected onto a solid, working through a silicone stent that was made from the model of the provisional restorations. This method allows the technician to duplicate the shape, length, and contour of the provisional restorations.3-5
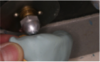
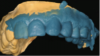
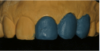
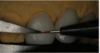
In this case, a silicone index was made from the existing mock-up model, and holes were placed around the prepared teeth, Nos. 9 and 11 (Figure 12). The wax was melted to 180° in the injection unit, which was pressurized to 5 psi. A removable die spacer was applied to the prepared teeth on the solid working model (Figure 13), and the melted wax was injected through one of the holes (Figure 14); when the melted wax came out the other hole, everything was filled. After the wax cooled, the silicone index was removed (Figure 15).
This method yielded an exact copy of the provisionals the patient was wearing. After excess material was removed (Figure 16), each unit was separated and transferred to the multiple-die working model to refine the margins.
In every case the author makes two working models—one solid and one multiple-die model. The individual restorations are sprued and invested and then placed in a burnout oven. The investment ring is placed in a pressing oven and pressed using lithium disilicate (IPS e.max®; Ivoclar Vivadent; www.ivoclarvivadent.us) ingots. Crowns are divested and separated from the sprue. After the fit is checked on the individual dies, the incisal portion is cut back and then layered with the appropriate incisal porcelains.
In another case, a patient had lost the veneer on No. 8. All the anterior teeth were previously veneered with the pressed lithium-disilicate (e.max) version. However, the author used his chairside CAD/CAM system (CEREC®; Sirona; www.sironadental.com) to fabricate the restoration. The CEREC system, like other chairside CAD/CAM systems, uses the millable version of the lithium disilicate (e.max). The result was that the milled version had a higher value than the pressed version and did not match the adjacent restorations. The hue and chroma were correct, but the value was different.
The Difference between Pressable Ingots and Millable Blocks
Clinicians should be aware that there is a difference in flexural strength between the pressable lithium-disilicate ingots used in the laboratory and the millable blocks (referred to as “blue blocks”) used with the CAD/CAM milling machines, even though they are made from the same batch of material. There is also an optical difference between the two versions. The manufacturing process for the pressable ingots and millable blocks starts from the same batch of material. The pressable ingots undergo complete sintering at the factory, resulting in a tooth-shaded lithium-disilicate ingot that can be hot-pressed to fabricate a restoration.
The sintering process for the millable block is stopped when the material is in the lithium-metasilicate form, which is blue in color. In this form, the block is easier to mill. Once the milling process has been completed, the restoration is placed in a two-stage oven, which completes the sintering process, increasing the flexural strength (not as high as the pressed version) and changing the blue color to the correct tooth shade. This sintering—also referred to as crystallization—transforms the lithium metasilicate into the lithium-disilicate form.
This interruption of the sintering process creates a difference in the grain size between the two material versions. The millable blocks actually have a smaller grain size, which has an effect on the optics of the ceramic. The millable form has a slightly higher value than the pressed form, while the hue and chroma remain the same.
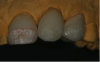
In this case study, the author had made a second set of crowns with the millable version of lithium disilicate. The CEREC system was used in the replication mode to copy teeth Nos. 6, 7, and 9 (Figure 17). After the milling process was completed, the three crowns were placed on the model and adjusted before the sintering (crystallization) was completed (Figure 18). They were then placed back on the model, where the incisal portions were cut back and layered in the same manner as the pressed version (Figure 19). The contours were then finalized before staining (Figure 20).
Laboratory Prescription
The laboratory prescription included a color map with measurements. It is helpful for the laboratory to see the characterization that is present and areas of different chroma levels (saturation) in the adjacent teeth through close-up photography (Figure 21). In addition, because the patient had a band of hypocalcification 4 mm from incisal edge, that measurement was recorded on the laboratory prescription.
Laboratory Provisional
A laboratory provisional, created as described below, can be used to duplicate the facial and dental midline and the existing cant of the patient’s pre-maxilla.
• Fill the vacuum-form stent with a dual-cure temporary material.
• Remove and replace the stent several times as the material begins to set to eliminate any undercuts.
• Once the material sets, remove the laboratory provisional from the stent.
• Using a pencil, mark the dental midline coincident with the facial midline.
• Send to the laboratory.
Once in the laboratory:
• The provisional is placed on a solid working model supported by “silly putty” so it is stable enough to hold models in place on the articulator.
• The midline (pencil mark) is aligned with a straight edge placed on the bench, so the sagittal plane is aligned with what exists on the patient.
• The maxillary is mounted on the articulator and allowed to set; then the lower model is mounted and verified with the straight edge.
Staining Process
In preparation for the staining procedure, a red wax margin liner pencil was used to mark 4 mm from the incisal edge (Figure 22). A red line was drawn to indicate the height of the white hypocalcifications present in tooth No. 8 (Figure 23). There were some bluish areas in the distal and mesial incisal corners of tooth No. 8. The wax margin liner pencil was used to create areas where the stains would be applied. The wax on the ceramic surface keeps the stains from bleeding together (Figure 24) and burns off during the heating cycle, leaving no residue. White, blue, brown, and ochre stains were then applied (Figure 25) based on the close-up photograph of tooth No. 8.
Insertion Appointment
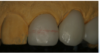
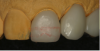
During the insertion appointment, the temporaries were removed and the prepared teeth were cleaned prior to the try-in. The pressed versions were tried in first for the patient’s evaluation. She was satisfied with the shape of all three crowns, but felt the color of No. 9 was too dark. Therefore, the pressed version of tooth No. 9 (Figure 26) was removed and replaced with the higher-value milled version (Figure 27), which she approved. The final combination of milled and pressed lithium-disilicate crowns achieved the patient’s expectations.
The crowns were etched with hydrofluoric acid for 20 seconds, rinsed, and dried. Silane was then applied. A dual-cure bonding adhesive was applied, air-thinned, and then light-cured. Using a dual-cure cement, the three restorations were inserted.
Photographs taken before (Figure 28) and after treatment (Figure 29) depict a satisfactory result for this discerning patient.
Conclusion
In the case presented, a discerning patient was fully apprised of the esthetic possibilities of presented treatments. The author used a “cookbook” approach that established her esthetic goals and the steps involved in achieving them methodically and predictably. By creating two versions of each of the three crowns—one version that was pressed and the other that was milled, the author was able to deliver a restoration that met the patient’s functional and esthetic needs.
References
1. Christensen GJ. Important clinical uses for digital photography. J Am Dent Assoc. 2005;136(1):77-79.
2. Almog D, Sanchez Marin C, Proskin HM, et al. The effect of esthetic consultation methods on acceptance of diastema-closure treatment plan: a pilot study. J Am Dent Assoc. 2004;135(7):875-881.
3. Helvey GA. Press-to-zirconia: A case study utilizing CAD/CAM technology and the wax injection method. Pract Proced Aesth Dent. 2006;18(9):547-553.
4. Helvey GA. Fabrication of porcelain laminate veneers from provisional restorations: the wax injection method. Pract Proced Aesth Dent. 2003;15(7):538-542.
5. Helvey GA. The wax injection method of replication teeth. Pract Proced Aesth Dent. 2003;15(5):361-363.
ABOUT THE AUTHOR
Gregg A. Helvey, DDS, MAGD
Adjunct Associate Professor
Virginia Commonwealth University School of Dentistry
Richmond, Virginia
Private Practice
Middleburg, Virginia