You must be signed in to read the rest of this article.
Registration on CDEWorld is free. You may also login to CDEWorld with your DentalAegis.com account.
Electrosurgery, also called radiosurgery, has been used in dentistry since 1914.1 Electrosurgical units use electrodes to apply heat to soft-tissue sites to thermally alter the tissue in a controlled and irreversible manner. They consist of two basic types. Monosurgical units operate by having the current begin with the electrosurgery device and travel along a wire to the oral site and then on to an indifferent plate behind the patient’s back. Bipolar units include two electrodes on the cutting tip and thus create a broader cut than do the monopolar devices. No indifferent plate is required. Monopolar devices have been reported to be more popular than bipolar ones.1 Both types produce heat, smoke, and pain as the electrode contacts the soft tissues, requiring the use of anesthetic.
As an alternative to electrosurgery, scalpels or lasers can also be used to cut soft tissue. Drawbacks to scalpel use, however, include excessive blood flow and inadequate visibility. In contrast, both lasers and electrosurgical units provide immediate hemostasis, thereby eliminating problems with visibility. Both lasers and electrosurgical units also can be used effectively for many of the same procedures, although they each offer unique advantages and disadvantages. Many dentists thus benefit from buying and using both.
This article reviews some common uses of electrosurgery in private practice. It also examines advantages and disadvantages associated with electrosurgery, and presents a number of clinical examples of how electrosurgery can be used to enhance the outcomes of general restorative procedures.
Basic Uses
Among the uses for electrosurgery are1:
1) Tissue management around crown preparations.Electrosurgery does not completely eliminate the need to pack retraction cord, but it can be considered an adjunctive technology for this application. For thin biotypes/periotypes, a diode or all-tissue laser may be preferable for “troughing” due to the larger zone of necrosis experienced with an electrosurgery instrument.
2) Pericoronitis flap creation.Depending on the thickness and density of the tissue, electrosurgery can often accomplish this task much faster and more easily than a laser could. In thick tissue, commonly used low-cost soft-tissue lasers (in the 2- to 2.5-watt range) tend to be slower and to drag a bit while cutting.
3) Frenectomy.Again, depending on the tissue thickness, electrosurgery will usually cut much more quickly. However, lasers will have a smaller zone of necrosis.
4) Removal of a lesion from the tongue.Although a laser can be used for this purpose, an electrosurgery unit or scalpel may be preferable because of the ability to cut fast and precisely. Before using either, anesthesia is recommended, although when using a laser, this may be only a topical anesthetic.
5) Gingivectomy.The extent of the gingivectomy and other conditions will dictate whether electrosurgery or laser surgery is the optimal choice. If the patient is already numb, electrosurgery can often be used expeditiously. If not, for example, for tissue overgrowth around orthodontic brackets, topical anesthetic and a diode laser would be faster and easier for the patient.
6) Removal of a small piece of soft tissue while making impressions for a crown.An electrosurgery tip, sharpened to a pencil point, makes a very narrow and precise cut. The electrosurgery electrode wire also may be bent to allow easy access to pontic areas that require contouring or palatal areas that have irregularities. Use of a laser removes more soft tissue.
7) Removal of any large piece of soft tissue.Because of the ease and speed of cutting, electrosurgery usually is the best option for this type of procedure.
In general, electrosurgery offers the following advantages: lower cost, greater speed than diode lasers, rapid hemostasis, good cutting consistency and precision, and nearly painless wounds.1-8
Disadvantages are also associated with electrosurgery.1-9 Whereas some diode lasers can be used on lower settings with little or no anesthesia, this is not the case for electrosurgery. Likewise, patients may be more fearful of electrosurgery and repelled by the smell/taste of burning flesh during the procedure. Electrosurgery is contraindicated around implants because of the high heat production while cutting, which can adversely affect osseointegration, whereas lasers can be used safely around implants. Lastly, because of the high cutting potential and low tactile sense while cutting, overcutting with electrosurgery is a risk. To help avoid overcutting, loupes are highly recommended, and the general rule is avoid using a setting that is too high for the density of the tissue that requires cutting. Starting at a low setting and then increasing the power until the electrode no longer drags through the tissue will help to ensure that the power level is adequate but not excessive.
Major Indications
Some of the major indications for electrosurgery are described and illustrated in the following sections.
Electrosurgery to Facilitate Placement of Direct Composite Materials
Tissue management during direct restorative procedures is an area where dentists can benefit greatly from electrosurgery. During cavity preparation, patients are almost always anesthetized. Nonetheless, delivery of a small amount of anesthesia into the soft tissue is recommended when a soft-tissue electrosurgical procedure is planned. For example, when interproximal electrosurgery is planned prior to matrix placement around a maxillary tooth, the interproximal tissues still might not be sufficiently numb from a vestibular infiltration. One solution is to administer 2% lidocaine with 1:50,000 epinephrine circumcoronally around the tooth that is being restored. Intrapapillary and marginal injections will blanch the tissue and gain soft-tissue anesthesia circumcoronally, preparing the patient for a number of procedures.
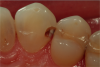
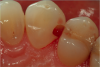
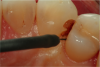
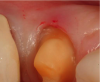
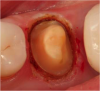
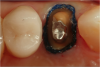
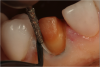
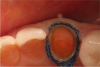
Figure 1 through Figure 5 illustrate the use of electrosurgery in the course of preparing a Class III cavity in the distal of a cuspid. In this situation, the electrosurgery unit was used to change a subgingival margin to supragingival, allowing for easier composite placement in an isolated field.
Electrosurgery for Tissue Management During Master Impression-Making
When troughing for master impressions is done using a two-cord impression technique, use of electrosurgery to help place the cords may be justified. Applicable situations include when the tissue is thick, when there is inflammatory tissue from a previous restoration, and when control of bleeding is difficult.
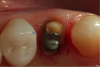
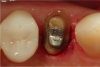
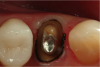
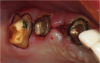
Figure 6 shows a premolar in a patient with thick tissue. Using electrosurgery to create a trough around this tooth (Figure 7) can significantly facilitate placement of the impression cord. An adequate zone of attached gingiva must be present, along with adequate horizontal gingival thickness. For a patient with a high smile line and thin anterior periotype, it may be advisable to trough on the palatal side of the tooth but not on the facial, where the esthetic result could potentially be affected.
Figure 8 through Figure 12 illustrate a case in which electrosurgery and a two-cord retraction technique were used to facilitate capture of the subgingival area well enough to create an excellent emergence angle and marginal fit to the restoration. As illustrated in Figure 11, bone sounding is recommended to determine that sufficient biologic width exists for safe use of electrosurgery in a gigivectomy procedure or whether bony crown lengthening is indicated.
Although hemostasis is generally good with electrosurgery, it may not be complete when chronically inflamed tissue is being cut. In such cases, retraction paste can be an excellent adjunct for tissue management. Figure 13 through Figure 15 illustrate a situation in which electrosurgery, retraction paste, and retraction cord were judiciously combined.
When using electrosurgery for troughing in preparation for making an impression, small tissue tags may result. These can potentially interfere with the flow of impression materials. The electrosurgical unit is well suited for such situations, as shown in Figure 16 and Figure 17.
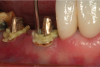
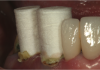
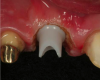
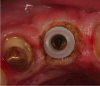
Electrosurgery and Zirconia Abutments
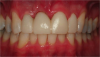
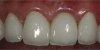
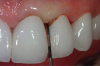
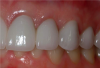
Because of the heat associated with it, electrosurgery is not appropriate for use around metal implant abutments. Lasers are better suited for that purpose. However, when a zirconia abutment will support the definitive restoration, electrosurgery can sometimes be an effective tool for creating biologic gingival contours around the abutment. Figure 18 through Figure 21 illustrate an example of such a case. A fixture-level impression was made to create a custom zirconia abutment for the left maxillary central incisor. The tissue biotype was thick. The tooth being replaced was triangular, and thus the root as it exits the periodontium at the level of the free gingival margin (FGM) was much greater than the actual diameter of the implant. To achieve the proper physiologic contours, the emergence angle and the crown must compensate for the discrepancy.
Electrosurgery and Respecting the Biologic Width
Work by Wentz et al in the early 1960s10 in developing a model of the biologic width determined the average sulcular depth to be 0.69 mm, the average junctional epithelium to be 0.97 mm, and the average connective tissue to be 1.07 mm. Spear11 and Kois12-14 later expanded on this work and found that to preserve the biologic width around anterior teeth, the distance from the equicrevicular margin to the bone crest should be 3 mm on the faciolingual aspects and 4 mm interproximally. For posterior teeth, they recommended a 3 mm distance circumcoronally (1 mm supracrestal connective tissue attachment, 1 mm junctional epithelium, 1 mm gingival sulcus). Thus, if the clinician measures a 3 mm sulcular depth and is contemplating a 2 mm correction to level the gingival heights to match the adjacent teeth, this would leave 1 mm of sulcular depth, a sufficient quantity for an acceptable esthetic result to be expected.
Bone sounding to determine that distance is thus an important and valuable diagnostic step. The goal is to determine whether sufficient attached tissue will remain below the corrected free gingival level. If not, ie, if the periodontal surgery will invade the biologic width, alternatives should be considered. Orthodontic extrusion might be advisable to relocate the osseous crest more coronally, compensating for subsequent osseous resorption and potentially greater soft-tissue loss.
Whenever performing periodontal surgery with an electrosurgical unit or any other tool, an additional consideration is the osseous crest position. The distance between the osseous crest and the FGM is an important predictor of the gingival level that will ultimately result.12 Based on data from a healthy patient population, for 70% of patients the height of the biologic width was approximately 2 mm. Three variations of the vertical distance from the osseous crest to the FGM—low, medium, and high—have been identified.13 The greater the distance, the greater the risk of tissue loss after any invasive procedure. In cases of a normal or high crest, with less than 2 mm of combined epithelial/connective tissue attachment, the soft tissue can be expected to resist gingival recession. A low crest, in which the combined epithelial/connective tissue attachment is more than 2 mm, is highly susceptible to gingival recession.
Following sounding, subtract the depth of the sulcus from the bony crest position. If the resultant biologic width is greater than 2 mm, then the bone is too far away from the base of the sulcus to get a good result, and recession will occur. This might not be a case where electrosurgery or a diode laser would be the modality of choice, but if either is used the author recommends not rushing to make a master impression. The tissues should be allowed to mature so that the margin position can be located accurately.
Figure 22 and Figure 23 illustrate a case in which these guidelines were followed, and an excellent esthetic result ultimately was achieved.
Conclusion
As with any technology, the key to successfully integrating electrosurgery into clinical practice is to employ it in appropriate settings. This article has reviewed some of those applications in periodontal and restorative dentistry. As noted above, the importance of sound diagnostic and biologic principles cannot be overemphasized; without these as the foundation of a procedure, no adjunctive modality will ever achieve optimal results, and long-term outcomes will likely be placed in jeopardy of failure.
ABOUT THE AUTHOR
Robert A. Lowe, DDS
Private Practice, Charlotte, North Carolina
REFERENCES
1. Christensen GJ. Soft-tissue cutting with laser versus electrosurgery. J Am Dent Assoc. 2008;139(7):981-984.
2. Louca C, Davies B. Electrosurgery in restorative dentistry: 2. Clinical applications. Dent Update. 1992;19(9):364-368.
3. Sherman JA. The radiosurgical approach to biopsy. NY State Dent J. 1998;64(3):33-35.
4. Rossein K. Predictable soft tissue management with radiosurgery. Dent Today. 2003;22(9):80-83.
5. Stubinger S, Saldamli B, Jurgens P, et al. Soft tissue surgery with the diode laser—theoretical and clinical aspects [French, German]. Schweiz Monatsschr Zahnmed. 2006;116(8):812-820.
6. Goldstein A. Radio microsurgery update: troughing and impression taking. Dent Today. 2007;26(11):120-121.
7. Madani M. Radiofrequency treatment of the soft palate, nasal turbinates and tonsils for the treatment of snoring and mild to moderate obstructive sleep apnea. Atlas Oral Maxillofac Surg Clin North Am. 2007;15(2)139-153.
8. Garg AK. Dental implants and electrosurgery: Bident Bipolar Electrosurgical System. Dent Implantol Update. 200819(2):9-11.
9. Sherman JA. Oral surgery simplified with radiosurgery. Dent Today. 2008;27(2):123-126.
10. Gargiulo AW, Wentz FM, Orban B. Dimensions and relations of the dentogingival junction in humans. J Periodontol. 1961;32(3):261-267.
11. Spear FM, Cooney JP. Restorative interrelationships. In: Newman MG, Takei HH, Klokkevold PR, Carranza FA, eds. Carranza’s Clinical Periodontology. 10th ed. St. Louis, MO: Saunders Elsevier; 2006:1050-1069.
12. Kois JC. Predictable single-tooth per-implant esthetics: five diagnostic keys. Compend Contin Educ Dent. 2004;25(11):895-900.
13. Kois JC. Altering gingival levels: the restorative connection part I: biologic variables. J Esthetic and Restorative Dent. 1994;6(1):3-7.
14. Kois JC. The restorative-periodontal interface: biological parameters. Periodontol 2000. 1996;11:29-38.